Blog

Huckleberry or Blueberry Sour Cream Scones

If you have huckleberries in your freezer, lucky you!  But these wonderful scones are great with blueberries also, just try them!


Recipe Directions:

Preheat oven to 400 degrees.

Have on hand: either 1 cup huckleberries or blueberries

Blend together in small bowl: 1 cup sour cream, egg, vanilla and almond extract, and baking soda.  Let mixture sit.

In another bowl whisk together: regular flour, baking powder, cream of tartar, salt and cinnamon.

In electric mixer bowl cream until light and fluffy (3 to 5 minutes): soft butter and sugar.

Add flour to mixture all at once, beat at medium speed just until small lumps appear.  The mixture should appear crumbly.  Gently fold in the sour cream mixture until moistened throughout, then fold in berries by hand.

Flour your hands, then lift out mounds of dough, scraping bowl until emptied, and divide mound in half, creating two 8” rounds about 2 inches high. If desired, sprinkle coarse sugar crystals over tops before cutting.  Cut each round into 8 wedges.  Place 2 inches apart on pans lined with either parchment paper or silpat liners.

Bake for 15 minutes on the middle shelf of oven. Rotate pan if needed, then bake 5 to 10 minutes more, until scones are lightly browned.

When scones are cooled, drizzle either simple powdered sugar glaze or white almond bark glaze.


Glaze Recipe:

Powdered Sugar Glaze:  Heat 2 tbsp milk in small bowl in microwave, add 2 cups powdered sugar and ½ tsp vanilla, beat until smooth and drizzle over scones. (Powder sugar glaze shown in picture.)

White Almond Bark Glaze: Melt white almond bark in microwave in a quart size freezer zip lock bag. Cut tiny hole in corner of bag and drizzle scones.


Read More

Amaretto Almond Biscotti

This biscotti (in Italian, say BEES-KOTEE) are so delicious that I make them in double batches, to make it worth the work, as they disappear so rapidly! They also make wonderful gifts, packed 6 or so in a qt. sized zip-lock bag. I will list the ingredients for a regular batch, however, and you can just double the ingredients, if you would like to make them as shown, using in your case two regular baking sheets.


Recipe Directions:

Preheat the oven to 350 degrees.

Blend together in a medium bowl: flour, baking powder, cinnamon, salt and set aside.

In a mixer bowl blend softened butter. Add sugar and beat until fluffy for at least 3 minutes. Then add eggs, amaretto, almond extract, vanilla and blend well. Fold in raw almonds and chocolate covered almonds.

With some extra flour on your board and on your hands, remove dough onto board, and divide in half.  Place dough on baking pan and shape each half into logs, about 3 inches across and about 14 inches long.


Allow space for some expansion during baking  Place pan on middle shelf of preheated oven and bake 30 minutes, or just until logs are set and beginning to brown on edges. Remove from oven, let cool about twenty minutes.


Turn oven down to 250 degrees.

With a serrated knife, cut logs diagonally  into one-inch slices and place back on baking sheet, top-side up, with a little space between.


Place pan of slices back into oven and set timer for 30 minutes. Check slices  to make sure that they have hardened and don’t give to the touch. If needed, place back in oven, turn it off or very low, and leave them to finish hardening.


When cooled, squiggle melted chocolate along tops of slices.


Chocolate Drizzle:

Add 2 large squares of chocolate bark to a quart sized ziploc bag. Place bag of chocolate bark in microwave for one minute. Press chocolate a bit, then melt 30 seconds more until it is completely melted. Remove from oven, snip tiny end of one corner of bag, and squeeze icing onto slices.

Read More

Jarlsberg Spread

One of our favorite family recipes that draws rave reviews whenever it is served at pre-dinner gatherings is  Jarlsberg (yarls-berg) and Caramelized Onion Spread.   It is simple, and I have taken photos as it’s being prepared to show you what I mean! The cheese is available at Costco and other grocers who stock good cheeses.


Recipe Directions:

Pre-heat the oven to 350 degrees.


Step 1: Melt about 1 tbsp butter in skillet, add onions, and cook very slowly under low heat, stirring often.  A lid on the skillet helps trap moisture.  The onions are cooked until they turn translucent and begin to change color.


Step 2: While the onions are cooking, cut up cheese, using a cheese knife to make it easier. Place cheese in a medium sized mixing bowl.


Step 3: When onions are caramelized, stir in the Balsamic vinegar until onions are well coated.  Add cheese and toss well.


Step 4: Add enough mayo to bind the mixture together and place in an oven-proof shallow dish to be baked.  Cover the bowl with foil and place in middle rack of oven and bake about 30 minutes. Remove foil and continue to bake about 20 more minutes or until mixture is bubbling and cheese appears melted. Blot excess oil from top with a paper towel if needed. (Spread can be covered and refrigerated overnight or until ready to bake and serve.)


Step 5: Serve! Spread is served with a spreading knife on sturdy crackers or French baguettes, toasted.


Read More

Hot Cross Buns

An intriguing history

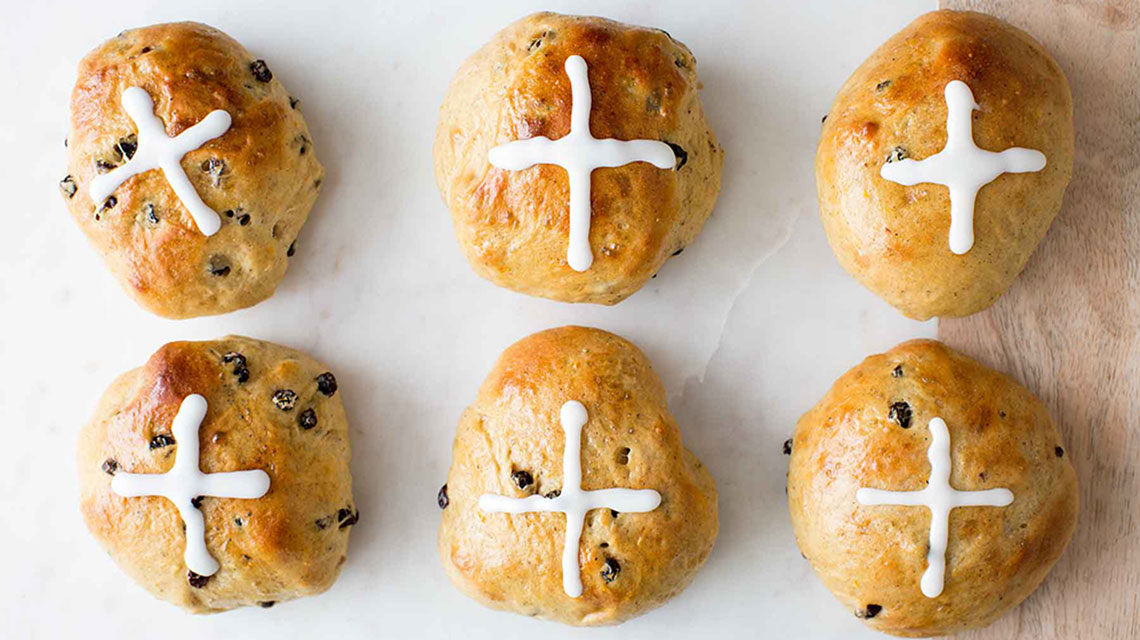
In many historically Christian countries, including ours, hot cross buns are traditionally eaten on Good Friday and the weekend of Easter, with the cross standing as a symbol of the crucifixion, but they have also become a tradition of springtime sales for many bakeries across the world. The slightly sweetened yeast buns studded with raisins are noted for the white icing cross across their tops, and are delicious served warm with butter for a coffee or teatime treat.

The first mention of “hot cross buns” seems to be around 1733, but when the buns became so popular, Protestant monarchs saw the buns as a dangerous holdover of Catholic belief in England. An attempt was made to ban the sale of the buns by bakers, but they were too popular for people of all beliefs, and instead Queen Elizabeth I passed a law permitting bakeries to sell them, but only at Easter and Christmas. Here in our country the buns are popular, especially in the eastern states in the springtime, regardless of beliefs.

The buns became such a tradition that there are several childhood ditties about them that many of us grew up with:

“Hot cross buns, hot cross buns,

One ha’ penny, two ha’ penny, Hot Cross buns.

If you have no daughters, give them to your sons,

One ha’ penny, two ha’ penny, Hot Cross buns.”

Ha’ is pronounced hay and meant a half-penny, which no longer exists in currency. There are also other versions of the ditty.

There are many recipes for hot cross buns, but I have found one which I like and have adapted slightly, and am submitting the recipe. They are easy to make, the only caution is to be patient with the rising, as it is a fairly heavy dough, and takes longer. For this reason I put the dough in a covered bowl to rise overnight in the refrigerator, and take it out to come to room temperature and rise a bit more in a warm place, then make the dough into rolls and let rise again before baking.

Recipe Directions:

Combine yeast, sugar, and milk in electric mixer fitted with a dough hook.

Beat on low speed one minute, add: the butter, egg and raisins.

Whisk together 3 ½ cups flour, salt, and spices, then add and beat on slow speed until the flour is incorporated, then increase speed. If the dough is not leaving the side of the bowl, add rest of the flour, until you have a dough that is beginning to climb up the dough hook. Remove the dough from mixing bowl, and with your hands form into a smooth ball. Place the dough in a greased bowl and turn to oil it on all sides. Cover and set in a warm place to rise, or in the refrigerator overnight. Either way, let the dough rise and is ready to form into buns. Place the dough on a floured surface, and knead lightly, then pinch off pieces about 2- 2 1/2 inches in diameter, and roll them in your hands to form a smooth ball. With the seams of the ball down, place buns two inches apart on baking pan lined with parchment paper. Four buns should fit cross-wise in the pan. You should have about twenty buns.

With a sharp knife, cut a cross on the top of each bun, about 1/8 inch down. Brush tops of buns with one egg which has been well beaten. Let rise again in a warm place. Preheat oven to 375 degrees. Bake buns about 15 minutes, turn and rotate pan and bake 10 minutes more, or until buns are golden brown. Remove to cool slightly on rack.

Mix together 3 Tb. warm milk and enough powdered sugar (1 to 1 ½ cups) with ½ tsp. vanilla to make a smooth, fairly thick icing. (I place mine in a Ziploc small bag, cut a small hole in the corner, and pipe a cross over the indentations of each bun.) Buns can be served warm, or placed in the freezer for later. They will not keep very long, but can be freshened up with a quick run through the microwave. Hot cross buns should always be served warm!

Read More

Pumpkin Pecan Scones

A New, Non-messy Technique for Making Scones!

I have entertained at the High Country Inn for several years now with High Teas, and as a middle course served homemade scones with “clotted cream,” but have never enjoyed the messy hands that result from having to handle the scone dough. Every recipe I have ever run across has called for cold butter, cut into tiny cubes, and mixed into the flour mixture until the butter is the size of peas. Well, just this last week, on the spur of the moment I decided to try to get some scones made in the hour I had before going to a morning meeting. In my hurry, before I knew it, I had softened butter and creamed it with the sugar before I realized with a jolt that I wasn’t on the road to making scones at all! So I gave that idea up and went to my meeting empty-handed, after calling myself several derogatory names.

Later that day I decided to just go ahead and see if I could salvage what I had started, even if it meant wasting two sticks of expensive butter! After thinking a bit, this is what I did. I went ahead and added the bowl of mixed dry ingredients to the creamed mixture, turned the mixer on low and blended it just until the whole mixture was crumbly. I then added the liquid ingredients, and it all came together, and could be turned out onto my board without being sticky. I couldn’t believe my good luck, and proceeded with getting the scones into the oven. The finished product was better than any I had ever made before. Thinking it might just be a fluke, the next day I decided to try the same method with two different recipes, and all turned out just the same! So I became anxious to share my “new” technique. Below is my recipe for pumpkin scones, ideal for serving for Thanksgiving breakfast, or any time you feel like a delicious scone! They also freeze wonderfully to thaw and reheat in the microwave. I hope you’ll try this new method of mine and enjoy making them. I’ll be serving them at the Christmas Tea if you can wait to taste them!

Recipe Directions:

Preheat oven to 400 degrees.

Grease or line two baking sheets with parchment paper or silicone (Silpat) liners.

Have ready: chopped pecans (optional, but delicious!) and coarse granulated sugar for sprinkling

Cream butter and brown sugar until just blended.

Mix together in separate bowl: flour, baking powder, salt, pumpkin pie spice

In another small bowl, mix together with fork: canned pumpkin, eggs, baking soda, whole milk or half and half cream

With mixer running, add flour mixture to butter and brown sugar, mix on medium high just until mixture is crumbly, scraping bowl once.  Immediately add pumpkin mixture and 1/2 cup pecans, and beat on low until it just comes together.  Turn out onto a lightly floured board, and with your hands form dough into about an 11-inch round.  Brush all over the top with half and half or milk, sprinkle over this coarse white sugar and rest of chopped pecans.  Cut into twelve even triangles, using a bench knife or other sharp knife, place 6 scones on each baking sheet, at least two inches apart.  Bake 10 minutes, rotate pans and bake another 3 or 4 minutes or until scones are lightly browned and firm. Let cool on pan. Ice the scones with Vanilla Glaze.

Scones can be made and frozen ahead for a delicious start to a holiday breakfast or any autumn or winter morning or afternoon!


Vanilla glaze:

  • 2 tbsp warm milk
  • 1 1/2 cups sifted powdered sugar
  • 1/2 tsp vanilla

Mix with whisk until well blended, and thick enough to set up (add more sugar if needed.)  Pour into a sandwich zip-type bag, close and snip a tiny bit off one corner.  Use this as a piping bag and drizzle criss-cross over each scone.


Pumpkin pie spice:
Make your own if you have the following on hand.  If not, it is probably less expensive to just purchase the prepared spice. Mixture can be multiplied to keep on hand.

Blend together, crushing any lumps:

  • 1/4 cup good quality cinnamon (Saigon or Ceylon)
  • 2 tbsp Ground ginger
  • 1 tbsp Ground cloves


Read More